By Brendan Odell, CAA Airworthiness Inspector
Proper performance checking of supercharged radial engines – whether pre- or post-maintenance, or preflight – is a critical task, which requires care, training and a good knowledge of what the procedure seeks to achieve.
Performance checking of supercharged radial engines generally follows the same general guidelines across various engine types – for example, the reference RPM check, using the much-loved Pratt & Whitney R-985, is done in a similar fashion to other supercharged radial engines, both large and small.
The basic intent of the power check procedure given in the Pratt & Whitney Wasp maintenance manual (in this case) is to measure the power output of the engine against an established standard. This is done at part power, not full power.
A normal aircraft engine is capable of delivering a given amount of horsepower at a given RPM and manifold pressure (MAP). This means that – with appropriate precautions – the MAP can be thought of as a measurement of power input (and air consumption) and the RPM thought of as a measurement of power output.
The propeller blades must be against their low (fine) pitch stops, since this is the only blade position at which the blade angle is a known and doesn't vary while the engine is running. In other words, at this point it's the same as a simple wood or ground adjustable propeller.
However, once the blades move off from their low (or fine) pitch stops, all bets are off. The governor will take over and maintain a constant RPM regardless of power input or engine condition.
Measuring power output

At a standard air density this power can be measured relatively accurately. It will always require the same RPM to absorb the same horsepower from the engine, day in and day out. If air density changes (for example an altitude change in the airfield where the engine is run), that's okay, the prop will still require the same power to furnish the same RPM if the relationship between power output and air density is kept constant.
This constant relationship is maintained simply by noting the reading on the MAP gauge during the pre-starting checklist and then setting the throttle to that reading when accomplishing the field barometric power check.
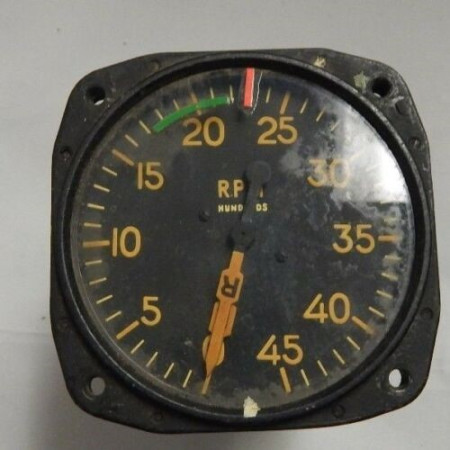
When you set this MAP, you should obtain a specified RPM on the tachometer. This RPM is known as ‘reference RPM’ and, as the Pratt & Whitney Wasp maintenance manual describes, it’s determined at engine installation and normally placarded in the cockpit (providing a repeatable standard to reference against).
A variance of 50 RPM is normally allowed in most installations to account for differences due to wind conditions. A headwind or tailwind will have a small effect on this number, ie, any appreciable headwind will have a tendency to increase your RPM due to the change in air load.
If the cylinder or carburettor air temperature is high because of factors other than atmospheric conditions, this will tend to give a slightly low RPM. Also, in extreme cases, high viscosity caused by low oil temperature will cause a slightly lower RPM due to friction loss.
Troubleshooting
Here’s an anecdote from the late Randy Sohn of the USA, explaining how this simple check can show up issues in the engine/propeller combination:
“After re-installing an overhauled R-1340 on a T-6 some problems were encountered in getting it to run right and I was asked to take a look at it.
“After completing a run-up I offered a few ideas and I then asked if the prop had also been worked on.
“I was told the engine was putting out exceptionally good power, probably due to an excellent job of overhauling. As evidence, they offered the fact that it was turning up about 2200 RPM at field barometric.
“My reply was, ‘Yes, and that's exactly the reason I want to know about the prop. I suspect that the pitch stops are at something other than normal for a T-6’.
“That turned out to be the exact problem, the high RPM had nothing to do with power output. A worn-out engine would have done the same. Apparently the stops were indexed at a lower setting.
“When subsequently re-indexed to the normal setting prescribed for a T-6, the engine turned 2000 RPM. Incidentally, the engine has turned out to be a very good one. But the RPM was lying when the prop was first installed – it did not indicate a surplus of horsepower.”

I had, as a licensed aircraft maintenance engineer, encountered the same issue years ago on a DC-3 after a prop change. After investigation we found the same – the prop low (fine) pitch stops had been set too fine. Upon correcting the pitch stops to the correct setting, the static RPM returned to normal.
Similarly, this check is normally carried out on many aircraft types on the first flight of the day, concurrent to a magneto check, to provide an assurance of engine performance.
In this check, finding the reference RPM low compared with the field barometric manifold pressure may indicate that one, maybe even two cylinders, are not firing, for example.
This would be undetectable on the instruments in terms of mag drop during a magneto check, despite the rough running engine (less so on bigger engines, such as the R-2800 where power impulses are closer together)), and even more telling, can be undetectable when applying full power.
In 1947, Pratt & Whitney demonstrated that some of their engines could be run with as many as two cylinders not firing at all, and still obtain take-off manifold pressure and RPM.
Pratt & Whitney wrote:
“It is difficult to see any tangible value in running the engine up to take-off RPM and manifold pressure as a routine pre-flight check. While it may give great satisfaction to the pilot to see these quantities registered on the instruments, a little analysis will show that this achievement is no guarantee that the expected power is being produced and delivered to the propeller.”
Therefore, understanding the proper relationship of reference RPM to field barometric pressure is critical to also understanding the performance of your radial engine.
In conclusion
The safest and most economic way to take your radial engine all the way to TBO has already been determined by the manufacturer. The only thing the operators and maintainers of these engines have to do is to follow the manufacturer’s instructions.
Ultimately, the operator of the aircraft is responsible (rule 91.101) for ensuring the aircraft is maintained in accordance with the manufacturer’s recommendations, as per rule 43.53(3)(i).
For more information
- Pratt & Whitney The Use of Operating Curves PWA 01.60, published December 1946
- Pratt & Whitney The Aircraft Engine and its Operation Operating Instruction 100, p 88-89
- Pratt & Whitney Engine Information Operation Letter No 10, Pre-flight power checking, 1947
Author’s note - Credit and thanks to the late Randy Sohn of Minnesota, USA, for supplying me with some of his own anecdotes. Randy sadly passed away in April 2020 from COVID-19.

