Instrument flying
The magnetic compass is the primary navigation aid for most light aeroplanes.
It's the only instrument in most light aeroplanes that indicates the correct heading. The direction indicator (DI) or directional gyro (DG) is simply gyro-stabilised and can be set to any heading. To be of any value it must be manually aligned with the magnetic compass on a regular basis.
In using the magnetic compass for navigation purposes there are more considerations than just the turning errors.
The magnetic compass displays several errors in its use, most of which the DI eliminates. If, for any reason, the DI becomes unusable, the pilot will need to be able to turn onto and maintain a compass heading.
The cause of compass errors is not as important as how to compensate for those errors in flight. A basic understanding of the causes of compass errors is all that is required.
To turn accurately onto, and maintain, compass headings, compensating for known errors in the magnetic compass.
The earth has a geographical (true) North Pole and a geographical (true) South Pole.
A magnetic field exists around the earth, produced by the equivalent of a very large bar magnet within the earth (see Figure 1). This results in a magnetic North Pole and a magnetic South Pole.
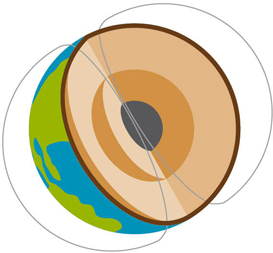
Figure 1 The earth has geographical and magnetic north and south poles
The magnetic poles are not in the same places as the true poles; however, currently they are close, enabling us to use magnets to navigate around the world.
The angular difference between true north and magnetic north at any point on the earth is called variation. This difference is more relevant when navigating because maps are drawn with reference to true north, and the aircraft is navigated by reference to magnetic north. This will be covered during future navigation lessons.
When the bar magnet or magnetic compass is acted on by a magnetic field other than the earth's, the magnet deviates. Most metal objects or electrical fields produce a magnetic field that will cause the compass to read incorrectly. This effect is known as deviation. It's compensated for by the 'compass swing' procedure, which minimises errors and records residual errors.
The compass deviation card displays the correction to apply.
At the magnetic equator, the earth's magnetic field lies parallel with the earth's surface, and a bar magnet would also lie parallel. As the poles are approached, the lines of flux dip down toward the earth's surface, and so does a bar magnet.
Suspending the compass card from a pivot point above the magnet almost eliminates dip.
The pivot arrangement is unstable, so the compass card and magnets are immersed in a fluid that damps out oscillations, and also provides lubrication (see Figure 2).
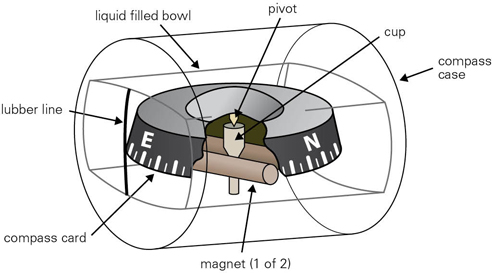
Figure 2 Magnetic compass
The compass always sits at a slight angle to the earth because the magnet is suspended below a pivot point. The centre of gravity of the magnet will not lie directly beneath the pivot point, and when the aeroplane accelerates or decelerates, the centre of gravity lags behind due to inertia and rotates the compass card.
This does not happen when heading north or south, and is at a maximum when heading east or west.
In practice, the compass will indicate an apparent turn toward the South when Accelerating and an apparent turn toward the North when Decelerating. The mnemonic SAND is used to remember these effects.
Power changes, in aeroplanes with sufficient power, produce acceleration or deceleration errors, although these errors are most noticeable during attitude changes.
In a balanced turn, the bar magnet stays aligned with the aeroplane and therefore increases its angle to the horizon.
To compensate for this, when turning onto northerly headings the pilot must continue the turn past the indicated heading, and when turning onto southerly headings, stop the turn before the desired compass heading.
The mnemonic ONUS is used to remember this (see Figure 3):
The compass turn is carried out at 'rate one' – this is a turn of 360 degrees in two minutes.
While turning at rate one, the error between the desired heading and the indicated heading on 000 and 180 is approximately 30 degrees. For this correction to work, the turn must be rate one, balanced, level and without pitch changes.
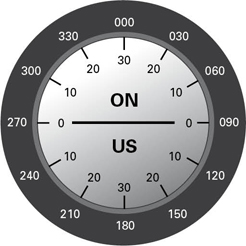
Figure 3 Using the mnemonic ONUS
The turn coordinator will indicate a balanced rate one turn at normal cruise airspeed (it will not indicate the angle of bank).
During taxiing, the compass is checked for correct sense – turning right, numbers increasing, turning left, numbers decreasing. On lining up, the compass heading is compared with the runway heading and can be expected to be within approximately 10 degrees.
The turn coordinator or indicator should also be checked for serviceability. Most turn coordinators are electrically driven and display a red warning flag when power is not being supplied. During turns while taxiing, the turn coordinator should display a rate of turn in the correct sense.
Emphasise that lookout is the most important part of any turn and must be maintained, before, during and after the turn.
The compass system should be checked for serviceability before flight.
If the fluid in the compass has bubbles or leaks out, the compass will become less stable. Check for cracks or fluid leaks as well as fluid discoloration.
Ensure the deviation card is valid by checking that the expiry date has not passed. Although the corrections given for various headings are generally considered insignificant for practical flight use, the deviation card is the only indication that the compass swing has been done, and that any errors found were not excessive.
The introduction of any metal object or electrical field, such as headphones, GPS, or calculators, into the cockpit will affect the accuracy of the magnetic compass. Keep these items as far away from the compass as possible.
Except for Technically Enhanced Aircraft (TEA), often referred to as ‘Glass Cockpit’ aircraft, vacuum pump failure is the most likely cause of DI failure, so the suction gauge should be checked during engine run-up (4.5 to 5.2 inches Hg).
To minimise disorientation, a three-dimensional picture, including the cardinal points of the compass, should be developed and retained in the pilot's memory.
In-flight mental calculations should be kept to a minimum.
The pilot should not have access to unreliable information that could be used. It's recommended that unreliable information, ie, instruments that have failed, are covered.
Draw the compass rose in plan view, and divide it into two halves with the cardinal headings labelled. Turning errors are zero on east and west, and a maximum of 30 degrees on north and south – label these.
Intermediate headings and their associated error are now labelled. In addition, the top half of the rose is labelled ON and the bottom half US.
This information will need to be memorised by the student and should be included in the lesson handout.
The procedure for turning onto a specific compass heading is broken down into several steps.
The turn is always made in the shortest direction. For example, a turn from east to north requires a turn to the left.
Given the presentation of the compass rose, this is quite a simple deduction. However, the aeroplane's magnetic compass does not present the information in this format. Therefore, some method of deciding the shortest arc to turn through must be provided to the student.
It's assumed that the DI has failed, or is unreliable, so should be removed from the pilot's scan. As the simple plan view of the compass rose is easy to interpret and is what the student has memorised, some other instrument, preferably orientated with north always at the top, is substituted for the DI.
There are several methods available.
First – and best – the back of the cover used to hide the DI could have a drawing printed on it that shows the error or correction associated with each cardinal and intermediate heading (see Figure 4).
Second, if the aeroplane is fitted with an ADF or VOR, the remote indicators associated with these (ADF card or CDI) may be used as a reference.
The first step in visualising which way to turn, is to read the compass. This heading is plotted on the substitute.
Then the desired heading is plotted in the same manner and the shortest arc chosen. For example, to turn from 040 to 270 – which way would you turn?
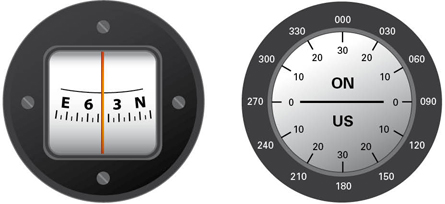
Figure 4 Aircraft compass (left), compass rose in plan view (right)
This method avoids mathematical calculations. However, when the heading required is near the reciprocal of the current heading, it may result in a turn the wrong way. In practical terms, if the desired heading is at or close to the reciprocal, a turn in the wrong direction will have little impact.
Without access to the error/correction drawing, this would require the student to know, for example, that 120 is a southerly heading.
In practice this can be deduced from the methods above.
Unless a drawing on the back of the DI cover is supplied, the student needs to memorise the correction factors.
There are three methods to determine this.
First, the heading on which to start the roll out can be calculated mentally by adding or subtracting the correction factor. However, this not only requires an appreciation of whether to underturn or overturn but also depends on which way the turn is being made. For example, a turn onto north from 090 requires an overturn of 30 degrees to a roll out heading of 330 (subtract 30), while a turn onto north from 270 will result in a required roll out heading of 030 (add 30).
The second method relies on the emphasis placed on the meaning of overturn and underturn.
Overturn means go past the desired heading, while underturn means to stop short of it. In the case of overturn, therefore, the turn is continued until the desired heading is seen under the lubber line and the turn continued for the appropriate correction. In the case of underturn, when the desired heading is seen approaching the lubber line the roll out is started before the desired heading is reached by the appropriate correction.
A third method, more appropriate to CPL training than basic training, of estimating when to roll out relies on timing. Since a rate one turn results in a turn of 360 degrees in two minutes, the rate of turn is calculated as three degrees per second. Knowing the arc to be turned through, the amount of time required at rate one can be calculated and the turn timed using the clock.
When the calculated heading to roll out on is seen under the lubber line, roll out smoothly. Anticipation of the heading by 3 degrees, given the roll out takes about one second, should allow for an accurate compass turn. Immediately choose a reference point on the horizon and fly on the reference point, wings level, and balanced. Give the compass time to settle – don't chase the heading.
When reading the compass, ensure that the wings are level and that the aeroplane is in steady balanced flight, as these are the only conditions under which the compass will read accurately.
Often the required heading will not have been achieved exactly, so minor corrections will need to be made using the 3 degrees per second rate one turn principle.
One method is to reverse the sense. For example, if the required heading is left of the lubber line, turn right. This sounds simple but many students find this method confusing.
Another is for the student to visualise themselves in the centre of the compass rose and looking down the compass heading over the nose of the aeroplane. If the compass reads, for example, 038 and the desired heading is 035, the desired heading is left of the present heading (see Figure 5). Do not look at the compass.
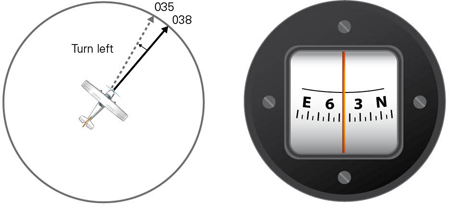
Figure 5 Visualise being in the centre of the compass
Yet another method is to employ the serviceability check carried out during taxiing, turning right, numbers increase, turning left, numbers decrease. Therefore, a turn from 038 to 035 requires a decrease or left turn. This method has the advantage that nothing new needs to be learned. But, this method works only for small heading changes, or corrections, and cannot be applied to the initial turn direction calculation. For example, turning from 030 to 300, the shortest arc is left but numbers increase to the right.
Where more than one method is available to explain a procedure or calculation, it's recommended that you choose only one explanation to deliver to the student. If the student cannot understand that explanation, rather than just repeat it a little louder, you can then use another explanation. Once the student has grasped the principles, other methods of arriving at the same conclusion can be introduced to reinforce learning.
There are two methods available to determine this.
The first, used primarily in instrument flight, relies on timing the turn at three degrees per second and is reasonably easy to do for small corrections: 5 to 10 degrees = approximately 2 to 3 seconds. Saying "one thousand" equates to about one second, therefore, begin counting when the rate one turn is started, rather than timing on the clock.
The second, used in a practical VFR sense, is to estimate the required heading change and select a new reference point on the horizon, and complete a turn onto the new reference.
In either case, roll out smoothly, maintain balanced level flight on the reference point, and allow the compass time to settle.
During the preflight inspection pay particular attention to the serviceability checks of the compass and the validity of the deviation card.
Look at the compass heading before turning the master switch on and the watch the effect of starting the engine.
During the taxiing instrument checks, note that the turn coordinator gives a rate of turn, not the angle of bank, and that the DI can be set to read any heading desired, regardless of the aeroplane's actual heading.
The airborne sequence starts with a demonstration of acceleration and deceleration errors. Maintaining a heading of 090 or 270 by reference to the DI or reference point, accelerate the aeroplane by smoothly pitching the nose down; note the apparent turn toward the south. This exercise is repeated to demonstrate deceleration effects by smoothly pitching the nose up; note the apparent turn toward the north.
Smoothly increasing and decreasing the throttle also produces this effect in all but low powered aircraft. Remember the engine handling principle of 3 seconds to open or close the throttle.
When this exercise is repeated on headings of 000 or 180 no apparent turn will occur, although the compass may be seen to dip. Ensure the aeroplane is kept straight by reference to the DI or reference point.
The demonstration of acceleration errors is concluded with a reminder that when accelerating, decelerating or pitching, keep straight on the reference point. In addition, to compensate for turning errors accurately, it will be necessary to avoid pitch changes during the rate one turn.
Turning errors are demonstrated by completing a 360 degree rate one turn and noting the difference between the compass heading and the DI on cardinal and intermediate headings. Point out that these errors or corrections are only true in a level, balanced, rate one turn. Start on a compass heading of 090 or 270 (with the DI aligned) and have the student read out the compass heading when you read out a DI heading. In a turn to the right you read out 030 (DI), the student should read out about 010 compass, a 20-degree difference.
Once the errors have been observed, a DI failure is simulated. Using the recommended steps, compass turns onto cardinal headings are practised.
Beware of lookout degradation during calculations.
Commonly, when the aeroplane is rolled wings level, there is a tendency by the student to fixate on the compass rather than maintain level flight on a distant reference point. This tendency can be overcome by covering the compass with your hand just as the student starts the roll out and insisting that they choose and fly a reference point. Allow the compass adequate time to settle, ensure the aeroplane is in balanced flight, and then remove your hand to read the compass.
Depending on which method is used for minor corrections, cover the compass again and calculate which way to turn. Calculate the time required or choose a new reference, turn and regain balanced level flight. Allow the compass to settle and remove your hand to read the compass.
When the compass reads the correct heading, emphasise the reference point to maintain heading. Do not allow the student to fixate on the compass – instruments are used to confirm performance, not set it.
The student will need to practise these solo.
Compass use whiteboard layout [PDF 58 KB]
Revised 2023