Circuit training
This briefing deals with those aspects of a normal circuit that were deferred during Circuit introduction to avoid student overload.
To continue circuit training.
To use the touch-and-go and go-around procedures.
To use the terms and procedures employed when a deviation from the normal circuit is required.
The touch and go refers to a normal landing followed by a normal take-off without stopping or braking. This procedure allows more circuits and landings to be practised, rather than stopping and taxiing back to the holding point – it's most common in a busy circuit.
This procedure is carried out only on runways of more than adequate length, assuming the aeroplane has touched down in approximately the correct place, ie, the threshold or numbers area.
Unless in an emergency, when power must be applied first, a standard touch and go should ensure the landing phase is complete before power is increased for the 'go' phase of the exercise.
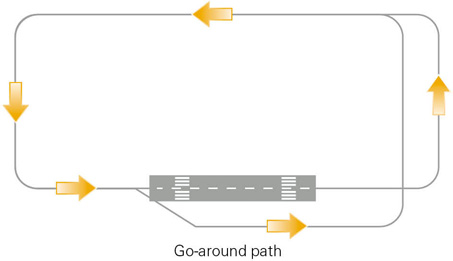
At any time after the approach starts the pilot may elect, or be instructed by ATC, to "go around" (see Figure 1).

Figure 1 The go-around
The instruction to go around means to discontinue the approach by applying full power (including carburettor heat OFF), climb straight ahead, retract any flap in stages, and follow the circuit pattern to position for another approach and landing.
The orbit is a procedure used by ATC to improve separation from aircraft ahead. The use of an orbit in an unattended aerodrome circuit is not recommended. Extending downwind or a go-around is preferred for separation.
An orbit is most commonly carried out on the downwind leg and consists of a 360-degree medium level turn, outside the circuit pattern, which positions the aeroplane back into the downwind leg, at about the same place, approximately one minute later.
As the first half of the turn is completed, a conflict with traffic approaching head-on is a real possibility, and therefore a good lookout is essential.
An orbit on final or base (with flap extended) should be avoided. The go-around procedure is preferred because it is specifically taught before first solo, whereas low-level turns with flap extended are not.
Extending downwind is another procedure used by ATC and pilots to improve separation from aircraft in the circuit ahead or joining long final. The aeroplane is flown on the reference point, parallel to the runway, for a suitable distance past the 45-degree base turn point, to achieve separation. The power setting selected at the extended base turn point will need to be higher, and a delay to both flap extension and descent may be required to regain the normal approach profile.
Repositioning may occur on any leg of the circuit, but it is more commonly at ATC request. This is the preferred method of repositioning where a change in wind direction makes a runway change advisable. Commonly, the aeroplane is flown to the middle of the old downwind leg and then a 180-degree turn made to position the aeroplane on the new downwind leg and the approach begun as normal. For runway direction changes that are not 180 degrees, the heading need only be adjusted to achieve a parallel track to the new runway in use.
Where cross, or multiple, runways exist follow the existing pattern to intercept the new pattern, and if that is not practical pass overhead the aerodrome to join the pattern at the beginning of the downwind leg.
Where this occurs on final, when parallel runways are in use, simply move over to intercept the final approach for the other runway.
The low-level circuit is carried out at less than 1000 feet AGL (or the promulgated circuit height), normally at 500 feet AGL, particularly in conditions of reduced cloud base. It is most commonly used by instructors, but it may be requested by the pilot or ATC. Only the briefest explanation of this term is included in this briefing for the reasons given in the notes below. How much to include should be referred to the CFI.
The low-level circuit is generally used by instructors to quickly position the aeroplane for the last part of the approach and landing so that the student can practise more landings. However, its general use is not recommended as all other legs of the circuit are either so rushed that the student has little opportunity to prepare for the landing, or are flown by you, providing the student with little opportunity to practise the other flight phases.
The low-level circuit does not provide an automatic right of way.
The practical application of the low-level circuit will be discussed and practised in precautionary landings. The need to teach low-level circuits before first solo should not arise (refer CFI).
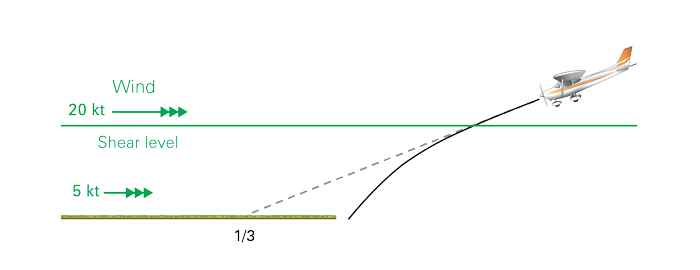
Wind gradient is the gradual decrease of the wind speed near the ground, due to surface friction and the air's viscosity. Discuss the affect it can have on the flare, in particular the inability to touch down at the planned point (see Figure 2).

Figure 2 Wind gradient
Windshear is a sudden change in wind speed or direction, most common in winds above 10 knots, and it is a hazard at low altitude. Discuss the Terminal Area Forecast (TAF) and ATIS contents, especially the relationship between the 2000 foot wind and the surface wind.
A sudden change in wind speed or direction can result in a sudden loss of airspeed and, due to aeroplane inertia, rapid loss of altitude (see Figure 3).

Figure 3 Windshear
The correct response is to apply power to arrest the sink and adjust the attitude to maintain the airspeed.
Where windshear is encountered unexpectedly a go-around will probably be appropriate.
Where conditions of possible windshear (or gusts) are reported or suspected, it is recommended that the approach and threshold speeds are increased. For example, if the approach speed is increased by 5 knots and a sudden change of wind strength results in a decrease of 5 knots in indicated airspeed, the actual approach speed would still be correct.
The decision to continue the approach at an increased approach and threshold speed must take into account available runway length.
Wake turbulence is a reasonably complex subject and can be dealt with only superficially in this briefing. You may prefer to make this the subject of a separate preflight briefing before the next circuit revision (refer CFI and the Wake turbulence GAP booklet).

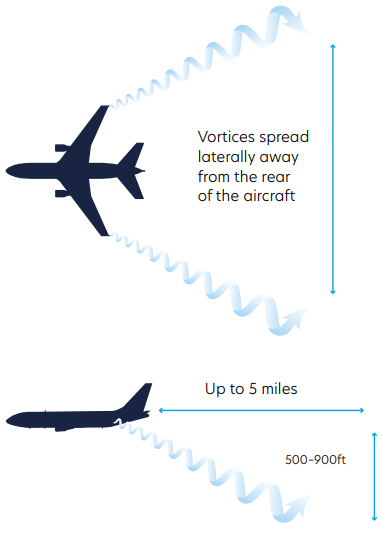
Figure 4 Wake turbulence
Wake turbulence is the disturbed air left behind an aeroplane when its wing is producing lift, and includes propeller slipstream and jet blast (see Figure 4). It's encountered when following too closely behind another aircraft, especially a heavier one, and is worst when that aircraft is at high angles of attack and flying slowly – during take-off or landing.
During the production of lift, air spirals off the wingtips (or blade tips of helicopters) in vortices that increase in size behind the wing, sink, drift downwind, and gradually dissipate. Note that helicopter wake can extend above the approach path.
This turbulence can induce a roll in the following aircraft that control forces cannot counter, and therefore it is extremely dangerous.
Wake turbulence is avoided while taxiing by allowing adequate separation for propeller or jet blast – jet aircraft always have their rotating beacon on when an engine is running.
Before take-off, allow adequate separation between yourself and heavier aeroplanes ahead (up to 3 minutes in nil wind).
During the approach, avoid getting close behind, downwind or below heavier aeroplanes. For example, if there is a crosswind, fly the final approach slightly upwind of the previous aeroplane or preferably fly above its approach path and descend more steeply.
Land past the point of touchdown of the preceding heavier aeroplane – as its nosewheel touches down there is no more lift being produced.
Consider runway length available – an early go-around may be more appropriate.
Fortunately, the dumb-bell turn is a fairly rare occurrence. It is used when a change in wind direction makes it advisable to change the landing direction by 180 degrees. On completion of the turn, the aeroplane is repositioned onto final for landing. If a dumb-bell turn is required, the take-off is continued to a safe height (500 feet AGL minimum) and a level turn is started in the opposite direction to the original circuit direction. Then the turn is reversed until an intercept on the final approach path can be made. Clearly, the amount of time available to prepare for the landing will depend on what height and how far out the initial climb is continued to.
No professional instructor would authorise early solo circuit practise when there is any likelihood of these conditions occurring. Likewise, no professional air traffic controller would request a student on first solo to carry out this procedure.
Refer to the separate Glide approach lesson.
Throughout circuit training you should continue to place more and more emphasis on the student's command decision making. The pilot's priority sequence for enhancing decision making whenever a deviation from the expected occurs should be assertively stated.
Aviate — Navigate — Communicate
The responsibilities of the pilot-in-command should be discussed with reference to ATC clearances or requests. Every clearance or instruction issued by ATC must be accepted by the pilot-in-command before it is acted on. The student should be encouraged to consider the probable outcome of complying with each clearance or instruction, giving due regard to their own capabilities and that of the aeroplane, before accepting the clearance or instruction.
Where the student considers the clearance or instruction to be unacceptable, the student must be encouraged to assert their pilot-in-command responsibility.
As in all other aspects of aviation, good aviation practice or common sense is a major factor in the acceptance or rejection of ATC clearances or requests. The pilot-in-command has responsibility for the safety of the aeroplane, passengers and crew – but not a right to be obstructive. The clearance, instruction or request should be complied with if, after due consideration, no adverse outcome as a result of complying with the clearance, instruction or request can be foreseen. If the pilot-in-command believes that the safety of the aeroplane may be compromised, then clarification of the clearance, instruction or request should be sought from ATC, an alternative suggested by the pilot-in-command, or the clearance, instruction or request refused.
The student should be fully aware that once a clearance has been accepted, it must be complied with (unless a change to the clearance is negotiated, or the pilot-in-command is reacting to an emergency) and that no matter what the clearance, instruction or request and who issued it, the pilot-in-command is solely responsible for the safety of the aeroplane, passengers and crew.
This may be a good time to remind the student that although you encourage them to make as many command decisions as possible, you are the pilot-in-command. One of the measurements of readiness for solo flight is the student demonstrating pilot-in-command actions.
The requirements for VFR inside a control zone should be revised, and the conditions that require a Special VFR (SVFR) clearance introduced.
It is the responsibility of the pilot-in-command to request a SVFR clearance before any of the parameters for maintaining VFR in controlled airspace cannot be complied with. Although it is not anticipated the student would operate in SVFR conditions, some exposure during dual training may provide a controlled experience.
There are no new aeroplane management considerations for this briefing so revise the SADIE checks.
Improve the student's situational awareness by encouraging them to orient themselves well, telling you which cues they are using for this will help you check that they are using as many as possible.
The air exercise discusses the procedures to be used for a touch and go (if applicable) and a go-around.
The touch and go should be a simple and logical extension of the landing roll.
Once the nosewheel has been lowered to the runway and the aeroplane remains under control, flap is raised to the normal take-off position and full power applied for another take-off. The weight is taken off the nosewheel with elevator, and the aeroplane is allowed to fly off. Keep the aeroplane straight on the centreline at all times. Don't look down into the cockpit.
Reassure the student that you will raise the flap for the student while on the runway – all they need to do is keep straight – and that once the flap is set for take-off you will say "flap up" and they are then free to apply full power and take-off. They must not apply power until you have advised them the flap is up.
The go-around is initially started at a safe height once established on final. Ideally, subsequent practice reduces the height at which the go-around starts. Circumstances may not permit this gradual introduction to the go-around.
Throughout the procedure you should emphasise the correct priority for dealing with the unexpected.
Aviate — Navigate — Communicate
The student should be made aware that this is a normal procedure, not an emergency. The student should be encouraged to carry out a go-around (and be praised for doing so) at any time throughout the approach to touchdown, if they are not confident about any aspect or parameter of the approach or landing.
Carburettor heat is selected COLD and full power applied. Raise the nose to the level attitude, or slightly above, and reduce the flap setting in stages (as appropriate to the aeroplane type) immediately.
If flap has been extended and the aeroplane trimmed for the descent attitude, there may be a very strong pitch up when power is applied. The student must be made aware of this and be prepared to prevent the nose pitching above the level attitude.
Don't hesitate to raise flap as soon as full power has been applied, control is assured, and the attitude adjusted. It's much better to accelerate over the runway rather than among obstacles in the climb-out area.
As the aeroplane accelerates, the attitude is adjusted so that the nose is on the horizon. At a safe height (refer CFI), and safe airspeed (through ____ knots), with a positive rate of climb, the remaining flap is raised gradually and the aeroplane allowed to accelerate to the climb speed. Climb to circuit altitude.
Regardless of when circuit altitude is reached, the aeroplane should be flown upwind along the climb-out path to the normal crosswind turn point. Turning crosswind early will shorten the downwind leg and may rush the student's preparation for the approach. Any decision to turn early must consider other traffic in the circuit and must have ATC approval (if in controlled airspace).
During the go-around, flying over the runway would mean flying over any aircraft taking off. The normal procedure, therefore, is to fly just to the right of the runway, so that the pilot has the runway on the left and can observe traffic on the runway or climbing out. This procedure, as with many other general rules in aviation, needs to be tempered with good aviation practice. Where parallel runways are in use, flying to the side of the runway may conflict with traffic landing or taking off on the parallel runway (refer CFI). In this case, it may be better to fly along the opposite side, or if it is known that no aircraft are taking off on the runway ahead, to maintain runway heading. If the go-around is begun on short final or later, the aeroplane is not flown to one side of the runway during the climb out because it is known there is no traffic ahead or below that might conflict.
With the aeroplane established in the normal climb and trimmed, it may be necessary to advise ATC that you are "going around."
The other procedures described under considerations (other than low level, which is discussed in the Precautionary landing lesson) are demonstrated and pattered when they occur.
The student should be familiar with the checks. They should also be doing most of the radio work on the ground by now.
Provided the student is fully competent in normal take-offs, this exercise is a repeat of the circuit introduction, except that you will be carrying out touch-and-go landings. You will need to raise the flap on the runway for the student, until they can manage to coordinate everything themselves.
At an appropriate time, and probably not the first approach and landing, you will introduce the go-around, from a sensible height. As the student becomes more practised at the go-around, you can gradually lower the altitude at which you give the command.
Keep the student working on their checks. Inform them that you will be expecting them to be doing most of the radio work in the next lesson.
Circuit considerations whiteboard layout [PDF 48 KB]
Revised 2023