Advanced manoeuvres
This is the second part of the forced landing without power lesson. It builds on all of the pattern information learned in the previous lesson, and introduces the checklists and further considerations.
In the previous lesson, the student practised the FLWOP pattern and the considerations of how the pattern is planned. They have had the chance in the meantime to start to learn the checks and revise the last lesson. The whole procedure is completed and practised in this lesson.
Aviate and then navigate remain the prime considerations of any emergency. When stress levels are high, always revert to aviate first, navigate second, and use only spare capacity for anything else.
To carry out the recommended procedure in the event of a total or partial engine failure, incorporating the appropriate checklists.
To practise aeronautical decision making (ADM) to troubleshoot and rectify a partial power situation.
The probable causes of engine failure are revised and the methods of avoiding this are emphasised.
The various factors affecting gliding range are discussed. The effects of L/D ratio, altitude and wind are relevant to the first requirement of landing site selection, ie, the site is within easy reach.
As was seen in the Climbing and descending lesson, glide range depends on the best lift to drag ratio.
When the aeroplane glides in the configuration for the best L/D ratio (_____ knots, no flap, propeller windmilling), the angle of attack is about 4 degrees, the shallowest glide angle is achieved, and the range is greatest.
If the nose attitude is lowered to glide at a higher airspeed, the range will be reduced. If the nose attitude is raised to glide at a lower airspeed, the range will be reduced. This can be verified with the VSI.
The visual illusion created by raising the nose – trying to stretch the glide – will require careful explanation.
Although raising the nose can make it look like the aeroplane will reach a more distant field, the aeroplane sinks more steeply than it would if flown at the best L/D ratio. This can also be confirmed with the VSI.
With the aeroplane trimmed to maintain an attitude for the best L/D ratio, if the reference area or point does not move down the windscreen, or at least remain constant – it cannot be reached.
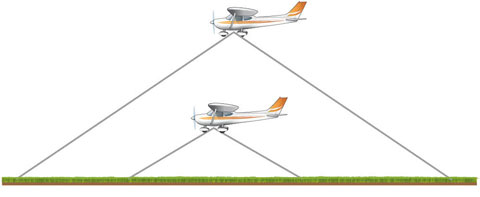
The gliding ability of every aeroplane varies but for the average light training aeroplane, 'within easy reach' is commonly described as: look down at an angle of about 45 degrees and scribe a circle around the aeroplane; anything within the circle is within easy reach.
The size of the circle will obviously be affected by height (see Figure 1).
Therefore, another of the most useless things to which a pilot is introduced – sky above you!
Never fly lower than you must!

Figure 1 Altitude affects the choice of possible landing area
Altitude (height) will also affect the amount of time available for planning and completing the recommended checklists.
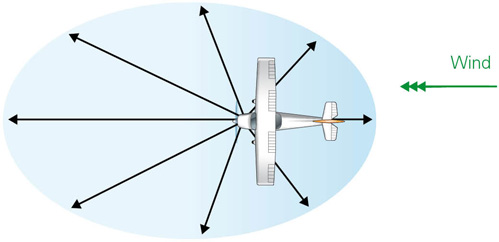
The glide range is increased by a tailwind and reduced by a head wind. Therefore, the affect of wind on range will be to elongate the circle downwind, producing more of an egg shape than a circle (see Figure 2).

Figure 2 The affect of wind on range
At the completion of the trouble checks, a check for partial power is made by opening the throttle to full power. If there is no response, the throttle is closed and the forced landing without power continued.
However, if some power is available, for example, 1800 RPM at full throttle, a range of choices become available. These will require the application of aeronautical decision making and pilot judgement.
The first decision to be made is whether to continue with the forced landing by closing the throttle, leaving the engine at idle and not relying on the available power. The alternative is to use the available power to transit to a more suitable landing site. This decision must be made with the knowledge that a partial power failure may become a total power failure at any time.
Even if the decision is made to close the throttle, partial power may be available if required on final approach – but of course, cannot be relied on.
Other factors that will affect the decision are:
The engine failure will be simulated from _____ feet by closing the throttle.
Ensure there is sufficient height to complete the checklists without undue haste during early student practice.
Revise the trouble checks, and identify which items are to be touch-checks only.
Introduce the pre-flight passenger briefing. The pre-flight passenger brief is used to describe:
Time spent on the ground reduces the time required to explain these points in the event of an emergency, and it improves the passenger's chances of exiting the aeroplane successfully.
Inform the student that from now on it is their responsibility to initiate the go-around, without prompting from you, at an appropriate height (refer CFI). However, if at any time you instruct them to go around, the student must consider the simulation ended.
The student should be reminded that, when authorised, this exercise may be carried out solo, but some limitations will apply.
In later lessons, this procedure will be carried out onto aerodromes (or landing sites) so that the glide approach can be incorporated and the complete forced landing procedure practised. However, the student should be aware that simulated forced landing practise does not provide them right of way.
Stabilise the engine temperature before beginning the exercise.
Warm the engine every 1000 feet, minimum.
Do not concentrate on the checklists at the expense of the pattern.
Stress is minimised by knowing the appropriate procedural response to the unexpected, regular practice and thorough pre-flight planning.
Engine failure will be simulated by partially closing the throttle at 3500 feet AGL for the first lessons, but will vary lower and higher with more practice.
F Fuel
Fuel selector ON, fuel pump ON (if applicable), change tanks (if applicable) (touch).
M Mixture
Mixture RICH, carb heat HOT, primer LOCKED.
I Ignition
Ignition on BOTH (touch), check temperatures and pressures.
P Partial Power
Power check.

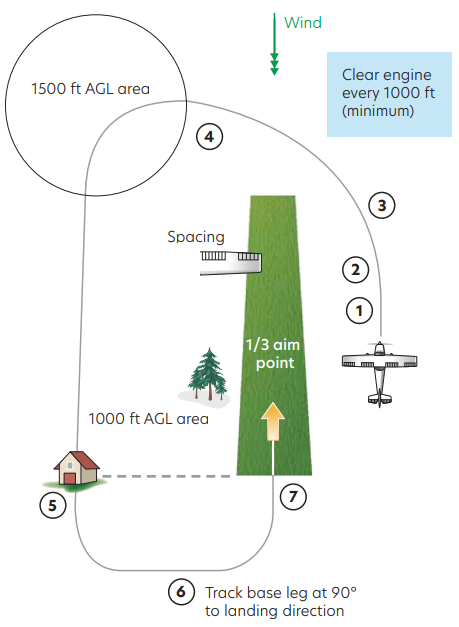
Figure 3 Pattern for a forced landing without power, showing the 1/3 aim point, 1000-foot area, and 1500-foot area
The principles of Aviate – Navigate – Communicate must be followed during FLWOP training.
| Aviate | Fly the aeroplane accurately and carry out the checks thoroughly. |
| Navigate | Maintain situational awareness. Keep the selected landing site in view at all times. Fly the aeroplane pattern so that you achieve this, adjust as necessary. |
| Communicate | Carry out a simulated MAYDAY call. Communicate with others on board to reassure and assist them. |
Select the carburettor heat HOT and close the throttle fully.
Convert excess speed to height by holding a level attitude until the speed approaches best glide speed, and then select glide attitude and trim. Glide speed of this aeroplane is _____ knots.
Check the aeroplane is maintaining the glide speed, re-trim as necessary. This will need to be checked regularly throughout the pattern.
The importance of good situational awareness comes into prominence here. Knowing the elevation of surrounding terrain and the wind direction (approximately) at all times will help if the engine fails unexpectedly.
With the wind direction confirmed, choose a landing site (with reference to the 'seven Ss, C and E'), and plan the approach. Identify the 1/3 aim point, the 500-foot area, the 1000-foot area, and the 1500-foot area.
The most important part of the plan is assessing progress into the 1500-foot area from wherever the aeroplane happens to be. "Am I confident of reaching the 1500-foot area at _____ feet?" If any doubt exists, a turn toward the area should be immediately started. If no doubt exists, the turn can be delayed.
Through all the above actions, the student should be encouraged to perceive all relevant threats at each stage, and ensure such threats are mitigated in actioning their plan.
F Fuel
M Mixture
I Ignition
P Partial Power
Assuming the partial power check proved no power is available, make a simulated MAYDAY call. The call can be spoken, but do not press the push-to-talk button!
The mayday transmission must be done reasonably early in the pattern because height is being lost, reducing the effective radio range (line of sight). Normally, this transmission is made on the frequency in use. However, if there is no response, or the frequency in use is considered inappropriate (for example, 119.1 aerodrome traffic), a change to 121.5 (touch) should be made and 7700 (touch) selected on the transponder.
If the Emergency Locator Transmitter (ELT) can be activated remotely from the pilot's seating position, select it ON (touch).
Valuable time can be saved here if a thorough briefing of the emergency equipment and exits has been given before flight. You are still responsible, however, for advising passengers of the circumstances and what you need them to do, succinctly and clearly.
If time permits, the chosen landing site and the direction of the nearest habitation should also be pointed out to the passengers.
Exits are unlocked (touch if applicable), but normally left latched. Depending on aeroplane type, exits may be jammed partially open. This prevents the doors from jamming closed should the airframe become deformed. However, it may also weaken the airframe – or it may not be permitted in flight (refer Flight Manual and CFI).
Check for loose objects, harnesses are tight, and all sharp objects such as pens and glasses are removed from pockets.
The passengers are also reminded to adopt the brace position on short final and are given a meeting point. The meeting point is nominated in relation to the aeroplane or some prominent ground feature. It is usually ahead of the aeroplane (upwind), assuming a landing into wind – to minimise the risk of burns should fire break out.
Warm the engine every 1000 feet of the descent. The last engine warm will be just before the 1000-foot area.
"Am I confident of reaching the 1500-foot area at feet?" If any doubt exists, a turn toward the area should be immediately started. If no doubt exists, the turn can be delayed.
The downwind leg starts from the 1500-foot area. It is vital that on the downwind leg the spacing is assessed in relation to the nominated point on the airframe to establish the correct circuit spacing.
These checks take the place of the normal prelanding (downwind) checks.
F Fuel
Fuel OFF (touch)
M Mixture
Mixture IDLE CUT-OFF (touch)
I Ignition
Ignition OFF (touch)
These checks are carried out to minimise the risk of fire.
M Master
Master switch OFF (when appropriate)
In addition, the master switch should be turned off (touch) to isolate electrical current. However, for aeroplanes with electrically operated flap, this action is delayed until the final flap selection has been made.
At the 1000-foot area, abeam the threshold, start the turn onto base leg while allowing for wind.
Throughout the approach, from the 1000-foot area down to the go-around point, continuous reference is made to the 1/3 aim point. No checks are carried out during this segment.
Judgement of the approach is helped by repeatedly asking, "Can I reach the 1/3 aim point?".
The aim of this process is to position the aeroplane at about 500 feet AGL, so as to touch down at the 1/3 aim point, preferably without flap.
From a position of about 500 feet AGL, when clearly able to touch down at the 1/3 aim point, the actual touchdown point is brought back toward the threshold by extending flap.
At the appropriate height (refer CFI) initiate the go-around. Have the student make an estimate of their ability to land within the available space, and where they think they would have touched down, had the approach continued.
Future lessons can be carried out over aerodromes, where the student will be able to complete the exercise to the ground.
Discuss pilot actions and responsibilities following an actual forced landing (refer CFI).
For more information on survival after a forced landing refer to the Survival GAP booklet.
Give the student plenty of time to observe the indications of wind direction and strength and to choose a suitable landing site. Revise planning the forced landing pattern before closing the throttle.
Begin the exercise at a suitable height (preferably 500 feet higher than the initial introduction to forced landings) to allow discussion of the checklists during the descent. Although a demonstration and patter may be given the first time the checklists are introduced, it may be of more value to allow the student to fly the pattern and have you do, call or discuss the checks as the plan unfolds (refer CFI).
Once the lesson is complete and during the return to the aerodrome, a partial power failure may be simulated and the considerations discussed.
Once the basic approach pattern has been mastered, the commencement altitude, circuit direction, and choice of suitable landing site should be continually varied so as to expose the student to a wide range of conditions.
Regular revision of these two exercises (total and partial power failure) will need to be simulated throughout the student's training, as occasional practice will have little real value.
Let the student know that the checks they were given after the last lesson must be committed to memory, as they could be needed at any time.
Forced landing without power – considerations whiteboard layout [PDF 796 KB]
Revised 2023